-
Notifications
You must be signed in to change notification settings - Fork 0
Create gauges in battle
This tutorial covers step-by-step the way of customizing the default battle's system of RPGMaker VX Ace, thanks to battles' events: the short circuits. We have already seen in the previous section how to create a gauge, we will put this in practice to add them in battle's phases.
When we are programming an events' system related to battle's system, we usually don't know how many ennemies there will be. Therefore, we will have to work with offsets, these are variables which will tell the first index. For more "legibility", we will use tags. For instance, we have no way to guess the number of gauges to display (because it changes from one combat to another), thus we will describe a tag corresponding to the first gauge's picture's ID.
As we will work on each monster individually, we will need what we call an iterator to retrieve each combat's monster.
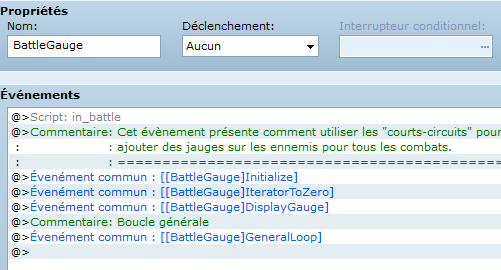
We will only use one common event named BattleGauge. It technically, call several common events that we will have previously created, but the only event used in_battle will be BattleGauge.

The first one represents the gauge's background whereas the second one is used to fill the gauge (gauge's body, in a way). Background is called miniA.png and body miniB.png.
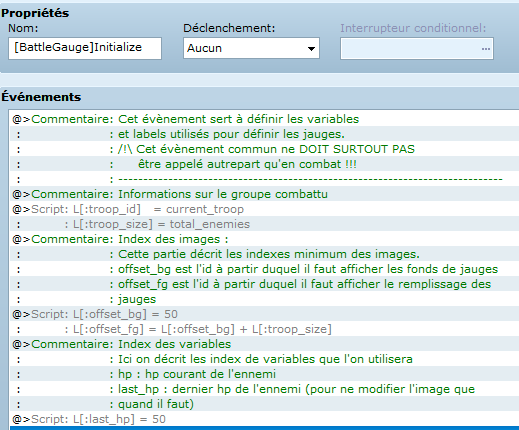
The first step of this tutorial will be the creation of a common event (which will be called [BattleGauge]Initialize). It will initializes tags that we will use.
This code is intentionally over-documented, let's specify what each of these variables is used for:
-
L[:troop_id]is really simple, this variable stores the monsters' troop's id. -
L[:troop_size]contains the number of enemies that the team has to defeat.
These commands are elaborated in the documentation, in this section In Battle
-
L[:offset_bg]andL[:offset_fg]give minimal indexes for gauges' background and body. Thanks to these indexes, we know that body's pictures will always be above background's ones because their ID begin after all displayable backgrounds. When we will speak about the iterator, we will see how to use these variables to create a gauge for each monster. -
L[:last_hp]is the variables' minimal index, in which is stored monsters' health points. (It will help us to modify the gauge's length only when the monster has taken some damages).
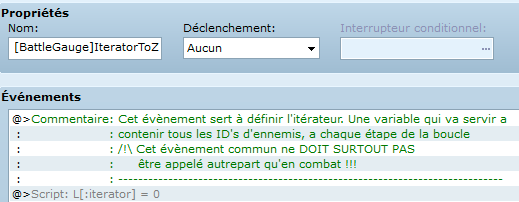
The iterator is a special tag. Actually, it is a variable which begins to equal zero and then increment itself at each loop's iteration; providing a way to know the sequencing of each iteration. As the enemies of a troop are referenced by a number (the first one being zero), the iterator provides a way to assign a loop's iteration for each enemy. For instance, to get the identifier of the gauge's background's picture of an enemy, you will only have to do L[:offset_bg] + iterator. To handle the iterator, we have created two common events. The first initializes it to zero and is named [BattleGauge]IteratorToZero:
Its behaviour is really simple: it assigns zero to the tag L[:iterator]. The fact that this behaviour will be repeated multiple times, is the reason why we defined a special common event for this.
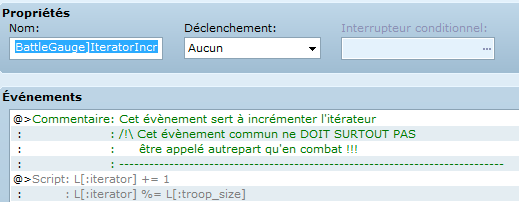
The second event, named [BattleGauge]IteratorIncr will take care of the iterator's incrementation:
It will only add 1 to the iterator, and will apply the modulo function (it finds the remainder after a division) on the enemies' troop in order for the loop to never exceed the number of enemies. For instance, let's look at this example:
Common_event("[BattleGauge]IteratorToZero")
Loop
  # Something
  Common_event("[BattleGauge]IteratorIncr")
End_loop
The L[:iterator] tag will always be contained between zero and the number of enemies (at the start, it equals -1, because the incrementation is the first thing done at each loop's step). This iterator will allow us to iterate over enemies, step by step.
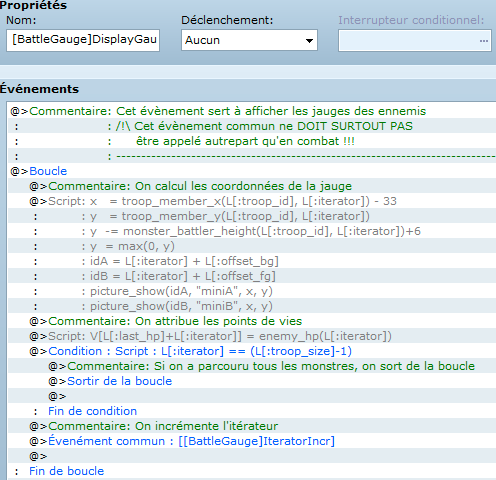
The purpose of this part is quite important because it will helps you understand the iterator's advantage. Here, we will have to display every gauges (full in the first place) above each monster. In order to do that, we will have to loop on each troop's monsters that the player is fighting, in the common event named [BattleGauge]DisplayGauges:
Warning ! As stated in the documentation, the command
monster_battler_heighthas a little changed. It now takes the position of the monster (whose we want to retrieves) in the enemies' troop as its first and only one argument. (The picture will be soon modified to avoid confusion)
This part is not really tricky (even if it seems ^^'). Technically, gauges' positions are computed. As you can see, we are using the sum of an offset and the iterator to retrieve the good picture's identifier. Some adjustements have to be made to correctly position gauges. -33 is there to center gauges above enemies (gauge's width is about 66 pixels). max's use ensures that the gauge will always be visible, even if a monster is too wide forcing the gauge's to get out of the screen, this last one will be stuck on the top of the screen.
At the same time, we initialize the variables which stores health points of each monster.
As the iterator is incremented (thanks to the common event), we have to explicitly tell it to exit from the loop once all monsters have been processed. That is to say when the iterator equals the monsters' troop's length, or -1.
We can then establish few axioms. Inside a loop which increments an iterator, starting from 0:
-
L[:offset_bg] + L[:iterator]: Gauge's background's ID for the monster corresponding to the iterator's value -
L[:offset_fg] + L[:iterator]: Gauge's body's ID for the monster corresponding to the iterator's value -
V[L[:last_hp] + L[:iterator]]: Variable containing the monster's previous health points
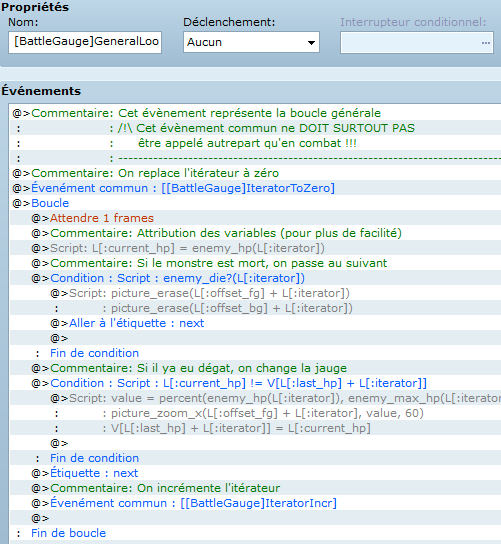
The previously introduced loops were all about initialization. Now, we will create the global loop which will repeat all along this combat. To do so, we creates a common event [BattleGauge]GeneralLoop. Its task will be really simple:
- We reset the iterator to zero and we iterate over what follows:
- We retrieve the health point of the current monster (the one corresponding to the current iterator's value)
- If the monster is dead, we jump to the loop's end (thanks to a tag) and we delete its corresponding gauge's pictures
- In order to know if a monster has been hit, we have to check that
V[L[:last_hp] + L[:iterator]]'s different from the health points that we have just retrieved. - If the monster has been hit, we determine its remainding health points and modify the picture referenced by
L[:offset_fg] + L[:iterator]. - Finally, we increment the iterator
Which gives:
The code may seem complex at first, but it is truely simple. Each step is explicit.
Now that we have all the preliminary work done, let's create the main common event that will orchestrate everything: BattleGauge. In this common event, we will only call the previously defined common events in the right order, and specify that this event has only to work when a combat is launched thanks to the command in_battle.
Here is what it looks like in the editor:
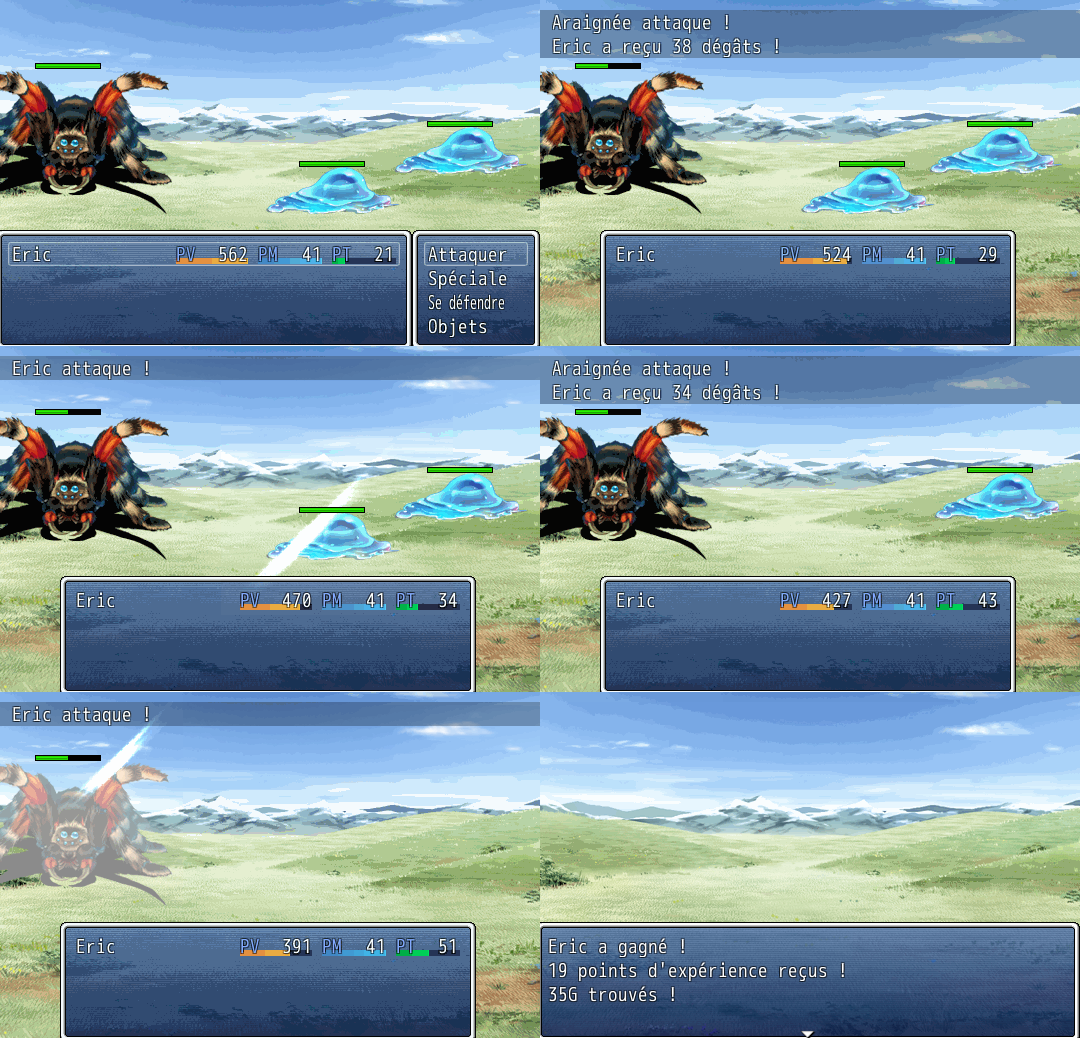
When everything is correctly done (i.e: you have respected each step), you can initiates (via the database, for instance) a battle with a troop of enemies, and see the gauges updating during the combat as in this exemple:
We have seen a first use of possible RME's hacks. Don't hesitate to suggest yours :).
The iterator's notion to build complex system is the main thing to keep in mind. You may need to read over this tutorial to fully understand its advantages and how it works.
Our system does not consider hidden monsters (their gauges will be displayed). We suggest you to recode the system in order to avoid hidden enemies as an exercise. Here is a command which will be helpful:
returns true if the enemy (referenced by the given position in the enemies' troop) is hidden, false otherwise
Name|Type|Description --- | --- | ---
position|Fixnum|Monster's position in the troop which the player is currently fighting (0, when the monster is the first one).
Technically, you will only have to avoid displaying its gauge and don't iterate over (because it is not a "casual" monster). Good luck !
Introduction
Revised Syntax
- Switches and variables
- Local switches and local variables
- Tags and local tags
- Displaying informations in messages
Commands
Extended events
Advanced tools
RMEx use examples
- Create basic gauges
- Create gauges in battle
- Create easily a QuickTime Event
- A minimal multi-agents system
- Custom names typing system
- Titlescreen's skipper
Scripters corner

