A module to use Visual Studio Application Insights with the DNN Platform CMS. The telemetry sent to AppInsights includes: page views, web requests, trace information (log4net log file content) and exceptions (including client side browser exceptions).
This module is a DNN Platorm extension to integrate Visual Studio Application Insights to monitor your DNN installation. To setup the module on your installation, follow these steps:
- Provision a new AppInsights service following the guide at https://azure.microsoft.com/en-us/documentation/articles/app-insights-overview/. Ensure you choose "ASP.net web application" on the "Application Type" parameter
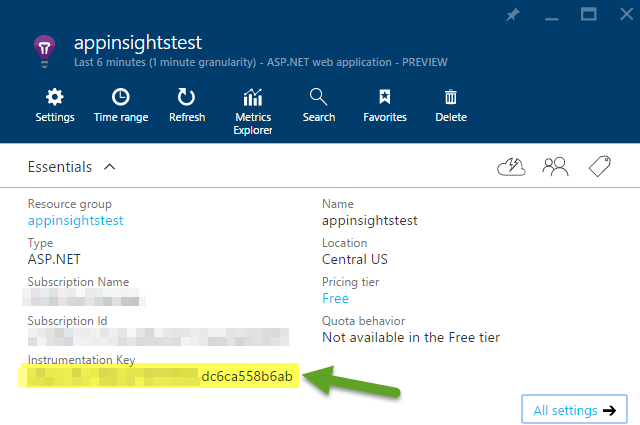
- Once provisioned, copy the "Instrumentation Key" available on the resource Essentials properties
- Now from the Releases section https://github.com/davidjrh/dnn.appinsights/releases, download the latest module package version ending on "...Install.zip" (the Source.zip package contains the source code that is not needed for production websites).
- Install the extension package in your DNN instance from the "Settings > Extensions" persona bar menu like any other module
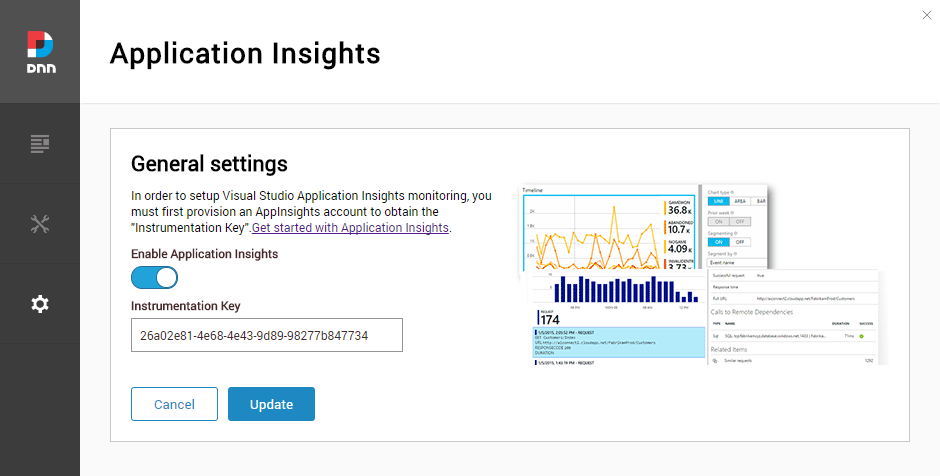
- Once installed, a new menu under "Settings > Application Insights" will allow you to paste the instrumentation key obtained on step 2. After appying the changes, you will start receiving data on AppInsights after a few minutes.
- Visual Studio 2022 (download from https://www.visualstudio.com/downloads/)
- npm package manager (download from https://www.npmjs.com/get-npm)
From the command line, enter the <RepoRoot>\AppInsightsProvider\AppInsights.Web and run the following commands:
  npm install -g webpack
  npm install -g webpack-cli
  npm install -g webpack-dev-server --force
  npm install --force
To debug the client side, build the module in debug mode and copy the .dll and .pdb files into your site /bin folder (you can tweak the post build event for such purpose). That will try to load the persona bar bundle script from https://localhost:8080.
The second step is to start the local webpack dev server. To do it,
From the command line, enter the <RepoRoot>\AppInsightsProvider\AppInsights.Web and run the following commands:
webpack-dev-server
Now you can build the solution by opening the AppInsightsProvider.sln file on Visual Studio. Building the solution in "Release", will generate the React bundle and package it all together with the installation zip file, created under the "\releases" folder.
On the Visual Studio output window you should see something like this:
1>------ Rebuild All started: Project: AppInsightsProvider, Configuration: Release Any CPU ------
1>  AppInsightsProvider -> C:\Dev\dnn.appinsights\AppInsightsProvider\bin\DotNetNuke.Monitoring.AppInsights.dll
1>  Hash: 8c2d469754dbc5e04ffd
1>  Version: webpack 1.13.0
1>  Time: 4162ms
1>         Asset     Size  Chunks             Chunk Names
1>  bundle-en.js  39.8 kB       0  [emitted]  main
1>      + 38 hidden modules
1>
1>  WARNING in bundle-en.js from UglifyJs
1>  Condition always true [./src/containers/Root.js:2,4]
1>  Dropping unreachable code [./src/containers/Root.js:5,4]
1>  Condition always false [./~/style-loader/addStyles.js:24,0]
1>  Dropping unreachable code [./~/style-loader/addStyles.js:25,0]
1>  Condition always false [./~/style-loader!./~/css-loader!./~/less-loader!./src/components/style.less:10,0]
1>  Dropping unreachable code [./~/style-loader!./~/css-loader!./~/less-loader!./src/components/style.less:12,0]
1>  Side effects in initialization of unused variable update [./~/style-loader!./~/css-loader!./~/less-loader!./src/components/style.less:7,0]
========== Rebuild All: 1 succeeded, 0 failed, 0 skipped ==========

