Email us at [email protected].
ClientComm allows you to send and receive text messages with your clients, right from your computer. It runs in your web browser, so you can use it from any computer or smartphone. Clients receive your messages on their phones, like any normal text. Clients respond on their phones, you receive their messages in ClientComm.
In this help section, we'll demonstrate:
- How to add and delete a client
- How to send and receive a single message
- How to schedule a message for later
- How to send a mass message
- How to send an image
- How to transfer a client to another officer
- How to update your account settings and route phone calls to you
- What happens if a client calls the ClientComm phone number?
- What happens If a client changes their phone number?
- What happens when a client texts me from their new phone number?
- What happens if a client calls me from their new phone number?
- How can I save ClientComm on my desktop/phone home screen?
- How you can be notified about new incoming messages
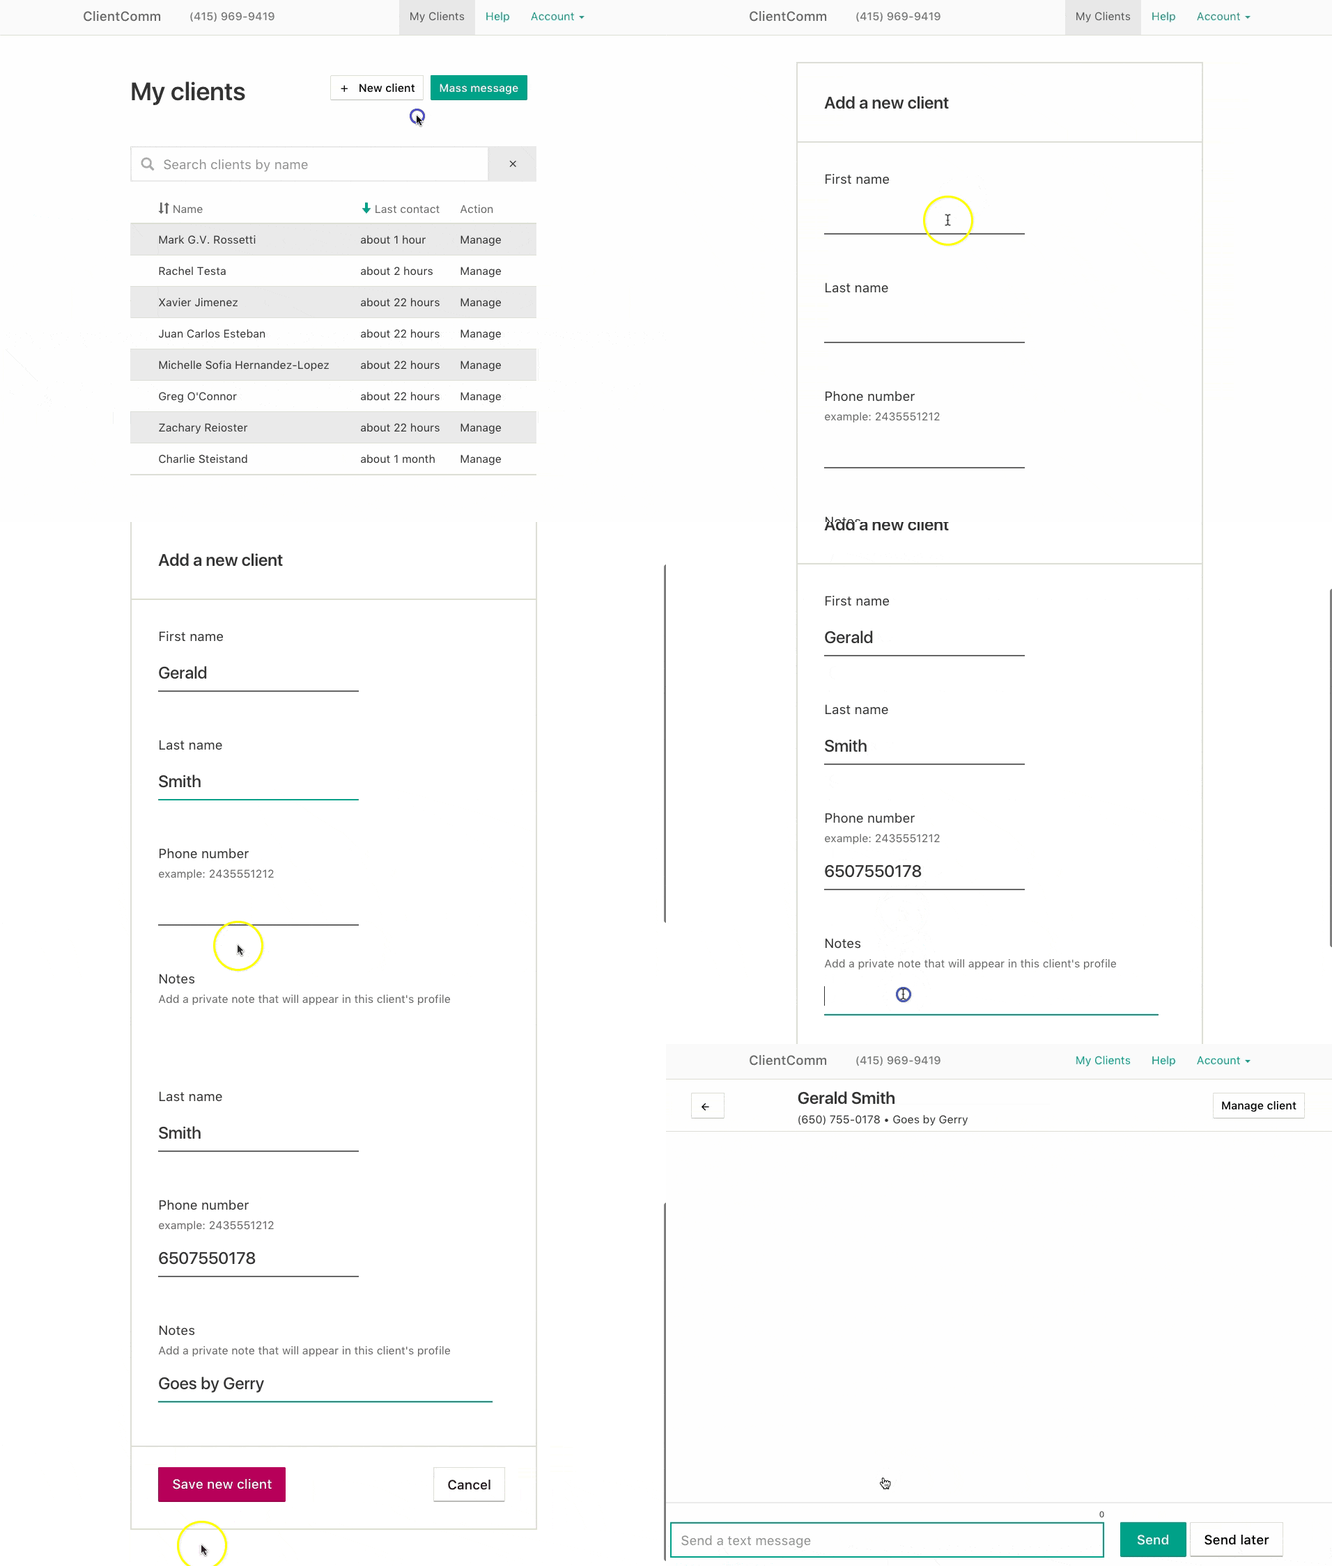
To add a new client to your contact list, click the "new client" button on the home page. Enter their name and phone number, and assign them a status. You can also add a note about the client. You can use this for anything you like: their ID number, upcoming court dates, or any personal information that will help you connect with them.
If you don't want to see a client on your contact list anymore, you can delete them. To delete a client, click on their name, then click the "manage client" button. Scroll down, and click the "delete" button. If you change your mind, you can add them back using the "new client" button on the homepage.
If a client sends you a text message after you've deleted them, they will be restored to your contact list so that you can respond to them. You won't miss any messages from them.
To send a message to a client, click on the client's name in your client list. If you can't find them easily, simply search for their name in the search bar. Type out your message and click "send". Underneath the message, you should see text that says "queued", then "sent". If the message was successfully delivered, it will say "delivered." If the message couldn't go through, it will show an error.
When a client sends you a message, you will receive an email notification. You can also see the new message on your ClientComm homescreen. If you click the notification, you will be able to read the message and respond to them.
Learn how to write a text now, and send it later.
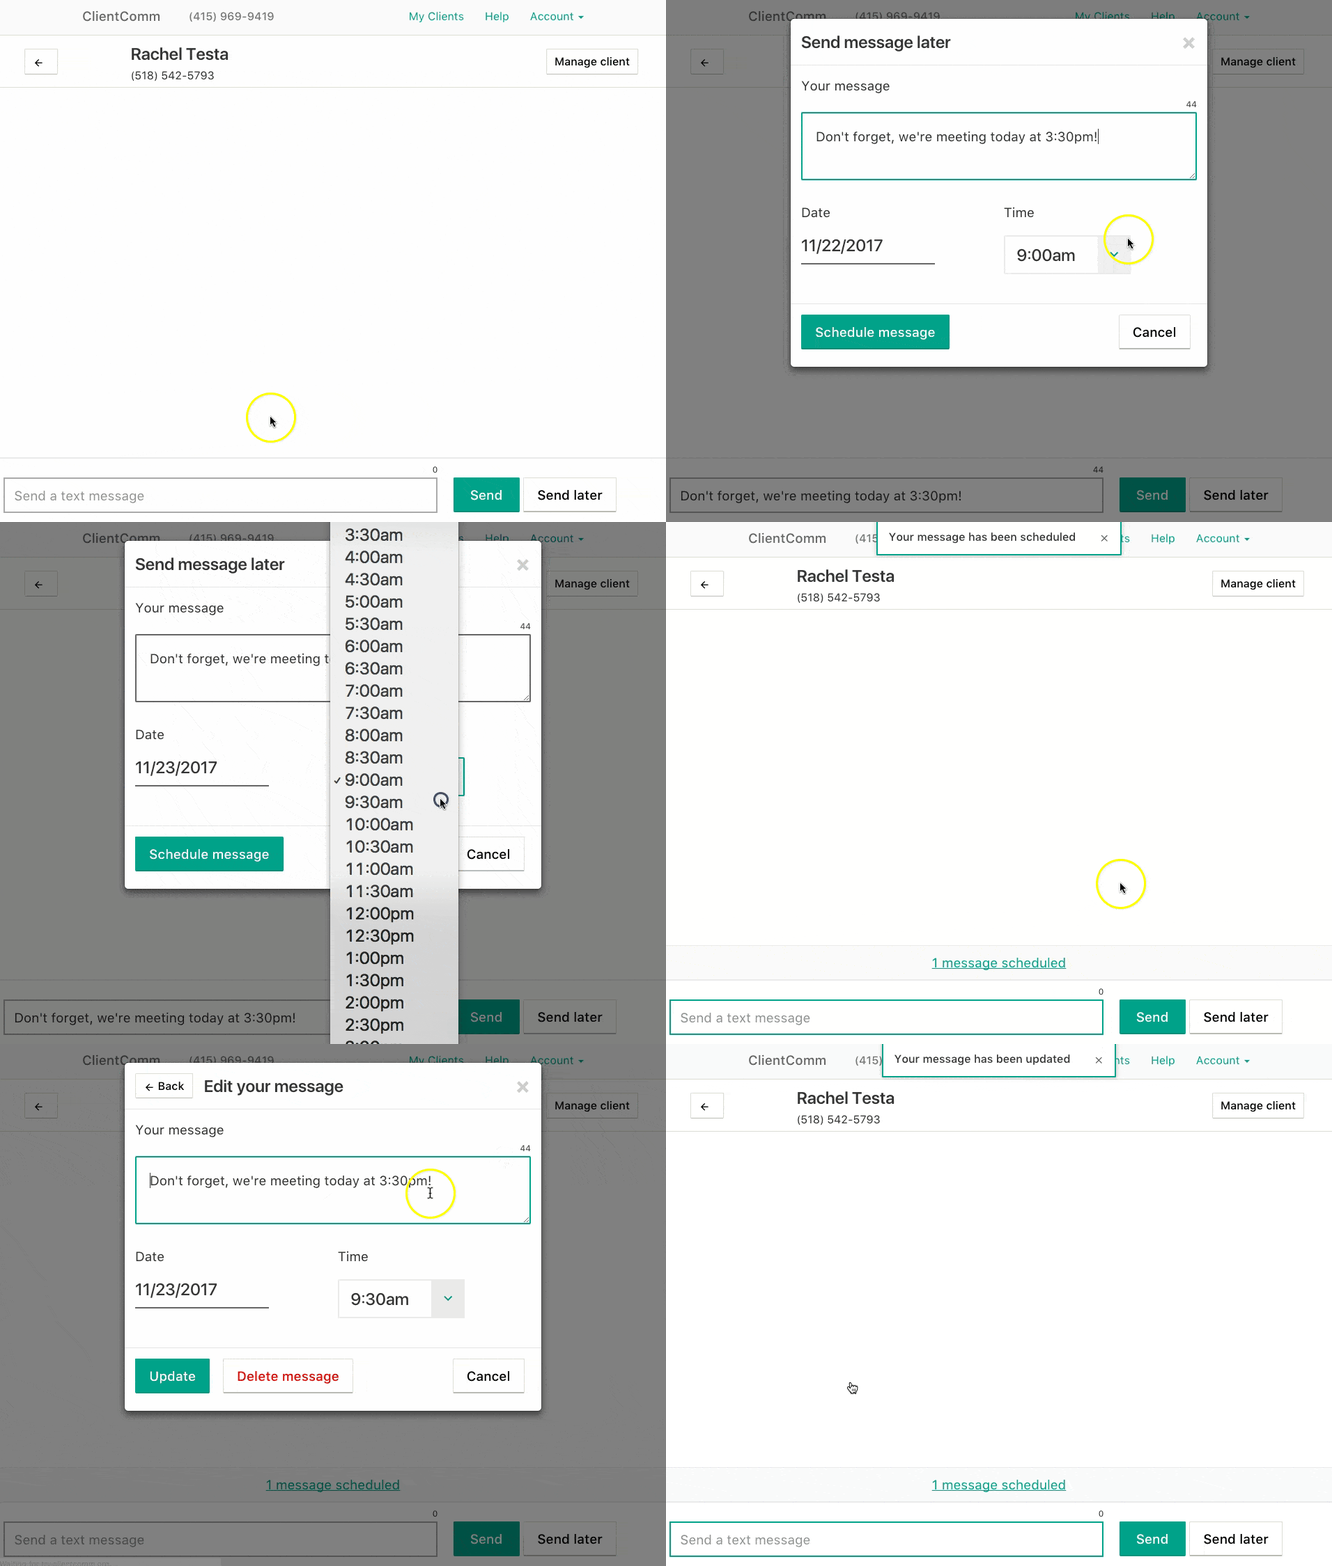
Click on the name of the client you want to send a message to. Click the "send later button" next to the send button. Write your message, then select the time and date you want it sent on. Then hit the "scheduled message" button. You can edit or delete the message at any point before it sends.
Learn how to send a mass message.
On the homepage, click the "mass message" button. Write your message, then select your recipients. You can check off just a few clients, or use the "select all" checkbox to choose all of them. There is no limit to the number of clients you can message at once. Then hit send!
The messages will go into the clients’ individual conversation pages, so you can easily keep track of replies. And there's no need to worry about privacy, the recipients won’t be revealed to each other. It’s just like BCCing an email.
- Checking in with multiple people at once
- Announcing an office closure or vacation
- Sending a reminder to class attendees
- Promoting a job fair or other event
Your clients value the individual relationships you build with them. Strike a balance between personalized messages and mass messages. Only send mass messages when they’re relevant to all of the recipients.
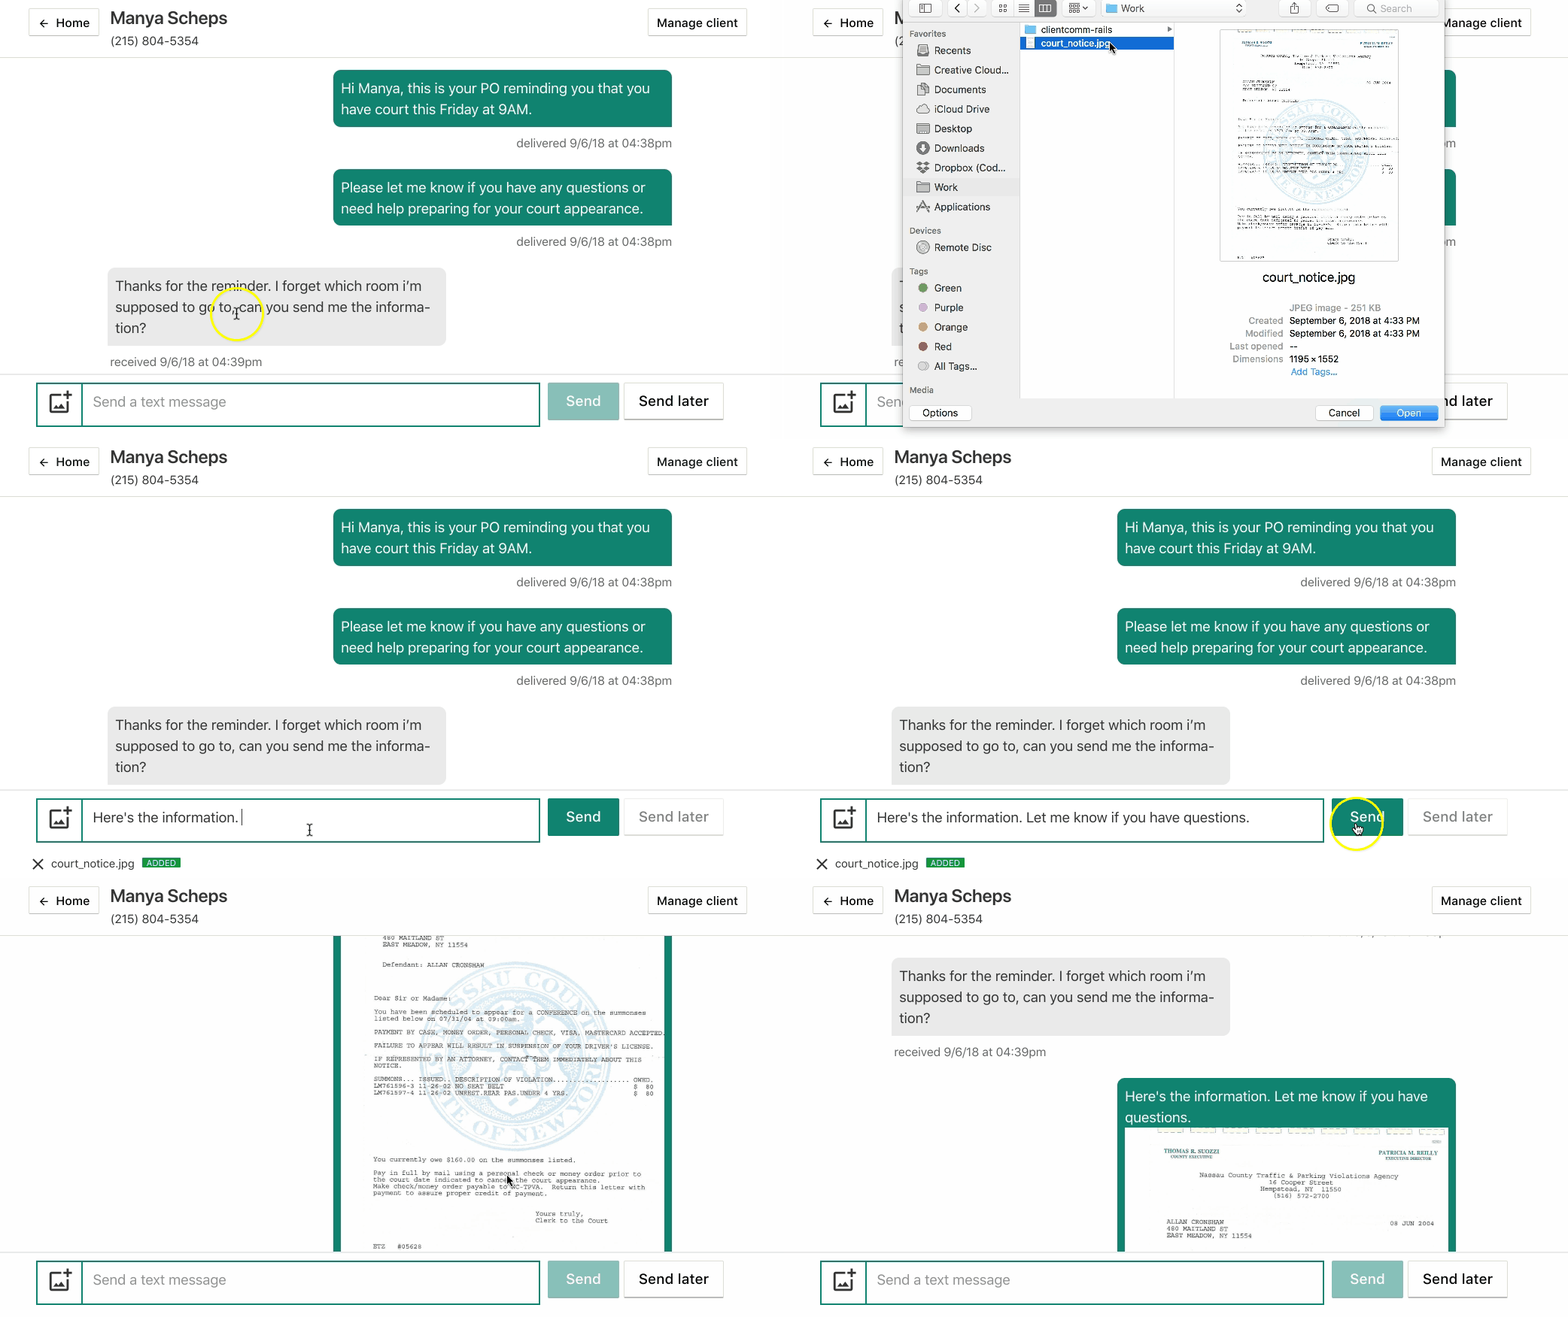
Now, in addition to receiving images from clients, you can send pictures from your desktop or cell phone.
- To send a picture from your desktop, click the picture button next to the message bar, and select the file you’d like to send. You can add a caption by typing in the message bar, or just click “Send” to send the image.
- To send a picture from your cell phone, you can select a photo from your photo roll or snap a picture and send it instantly through ClientComm on your mobile device.
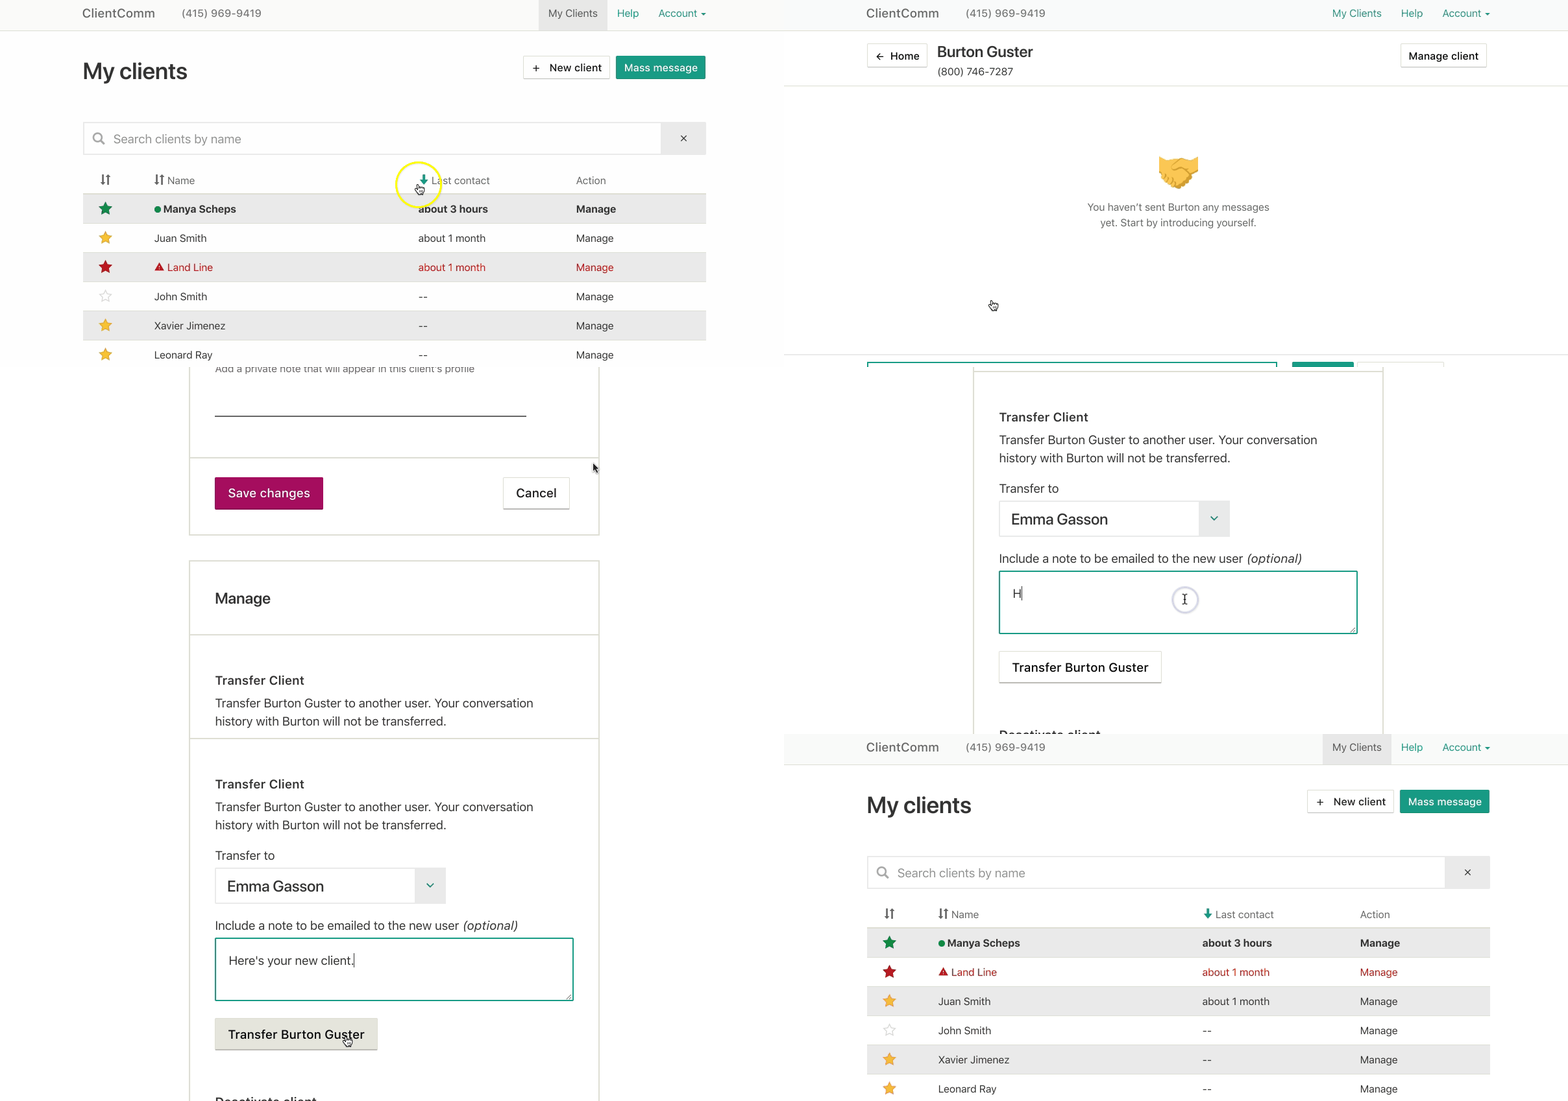
To transfer a client to another case manager, simply go to the "Manage" page for that client. Scroll below the client's details until you see the "Transfer Client" section. Select which case manager you'd like to transfer the client to and, if you want, add a note. Click "transfer". The new case manager will now see the client when they log into ClientComm.
When you transfer a client, your messages won't transfer to the new case manager. If you'd like to share your conversation with them, download a transcript of the conversation before you transfer the client and share that directly.
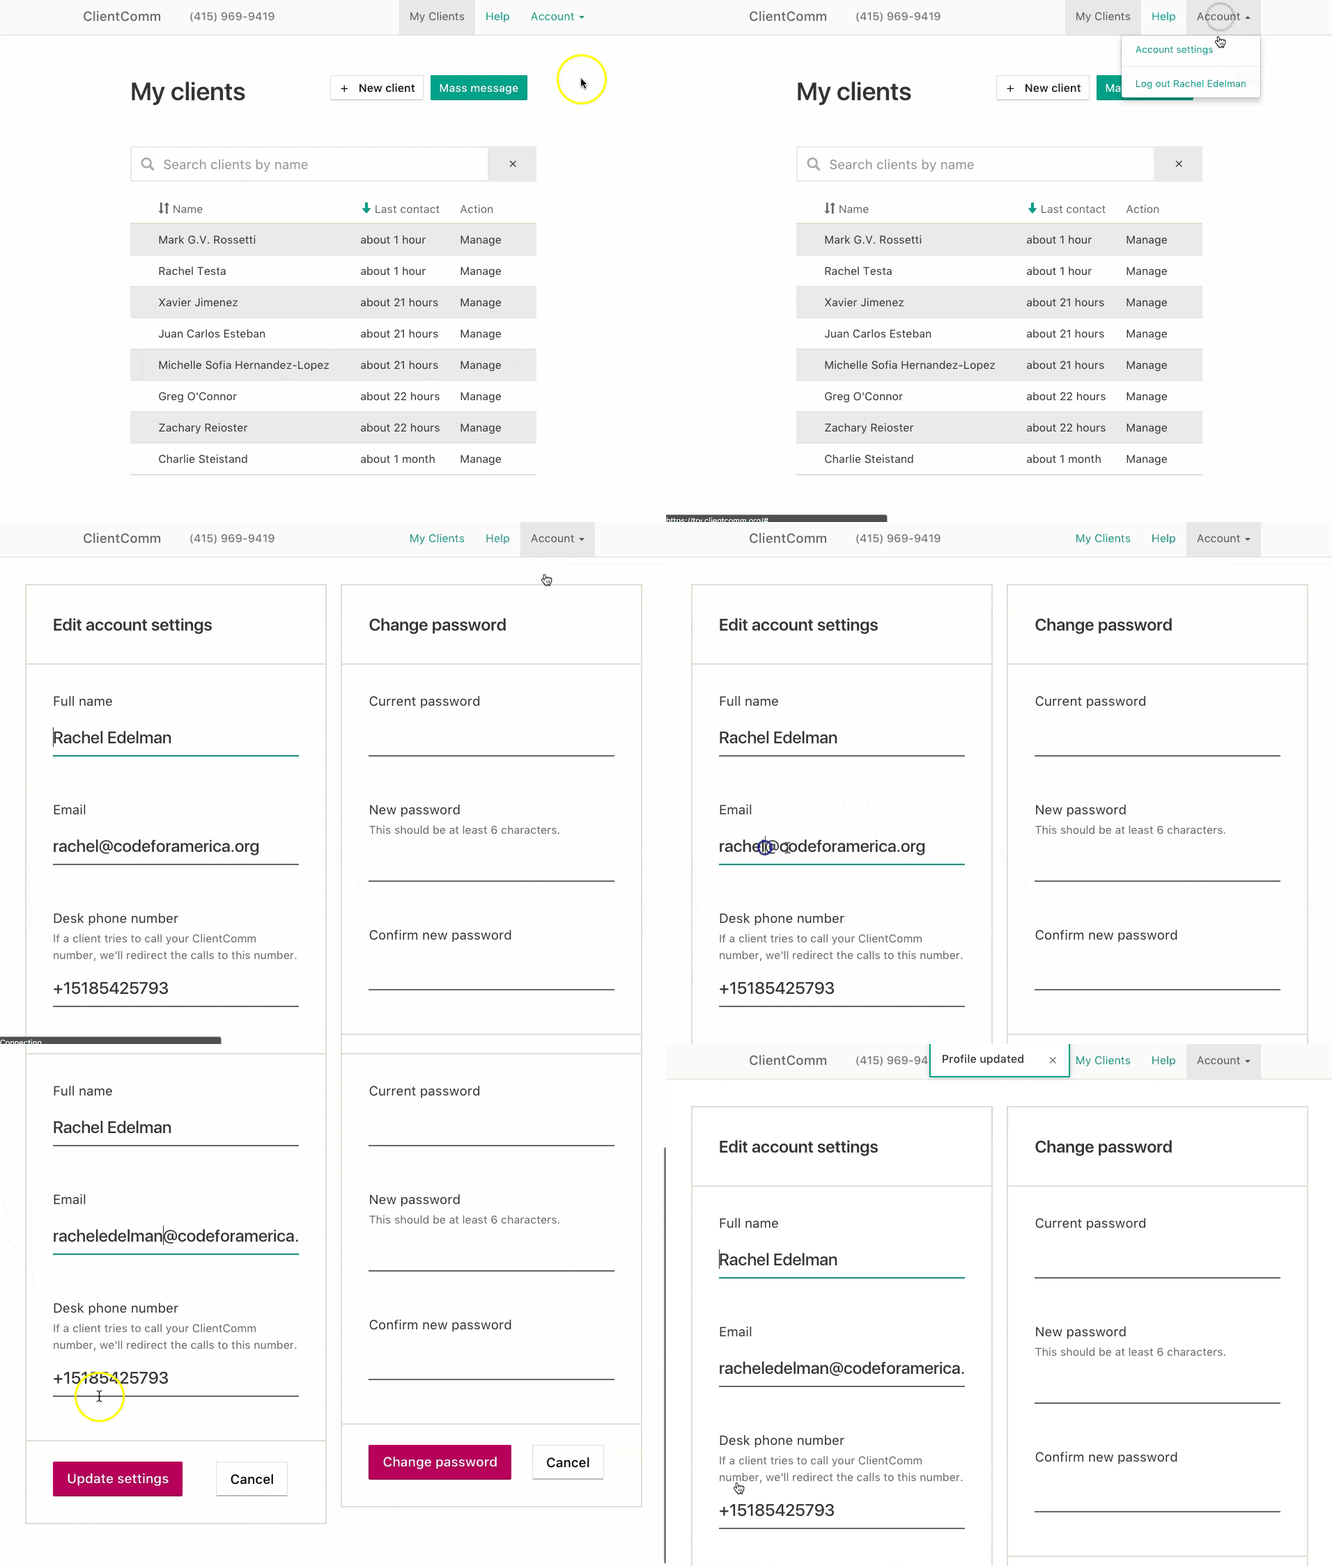
Change your password, email address, desk phone number, and more.
To update your account settings, click on the "account" link in the top menu, then click "account settings". You can change your name, email address, desk phone number, or password here.
Adding ClientComm to your desktop is an easy way to access it anytime.
-
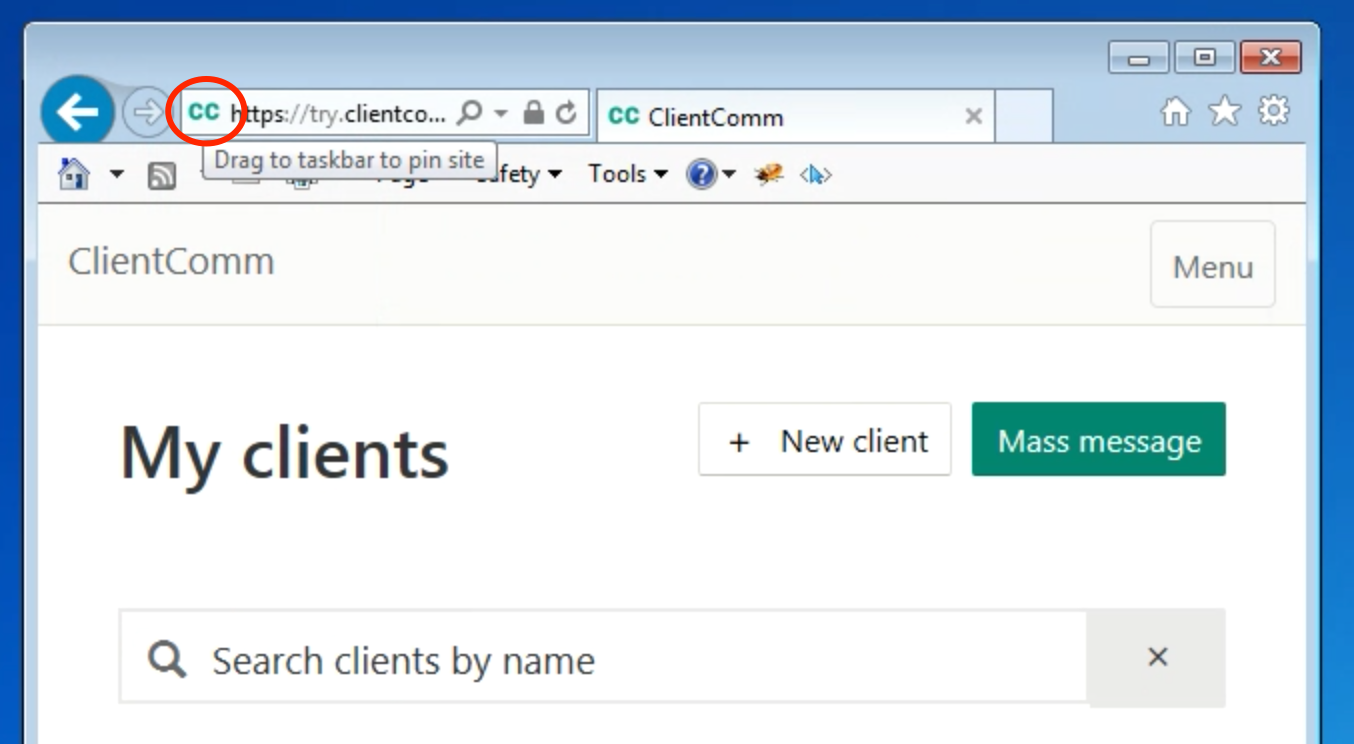
Open Internet Explorer and navigate to ClientComm. Sign in so you can see the home screen (your client list).
-
Click the "CC" logo next to the website address, and drag it down to the task bar.
-
Open Google Chrome and navigate to ClientComm. Sign in so you see the home screen (your client list).
-
Click on the 3 dots in the top right corner of the Google Chrome window. Scroll until you see “More tools”.
-
Click “Add to desktop”. ClientComm will now be on your desktop. If you'd like, you can right-click the ClientComm icon on your desktop and select "Pin to Taskbar" for even easier access.
You can use ClientComm on any smartphone. For quick access, follow the instructions below to add it to your home screen.
-
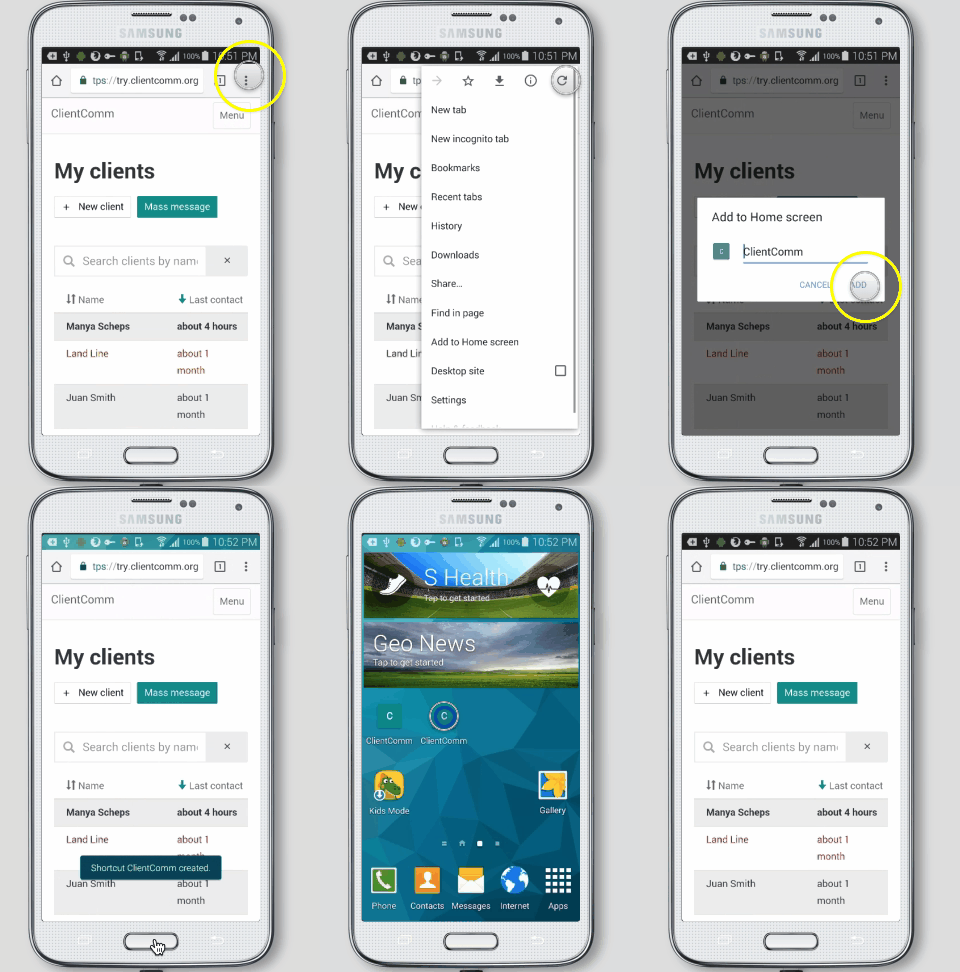
Open your web browser (Google Chrome) on your phone. Navigate to the ClientComm website and log-in.
-
Click the three dots at the top right of the screen.
-
Scroll down until you see “Add to homescreen.” Click it.
-
Click “Add”.
-
You should now see ClientComm on your home screen! You may need to swipe to find it. If you click it it will open ClientComm, and you can read and send messages from there.
-
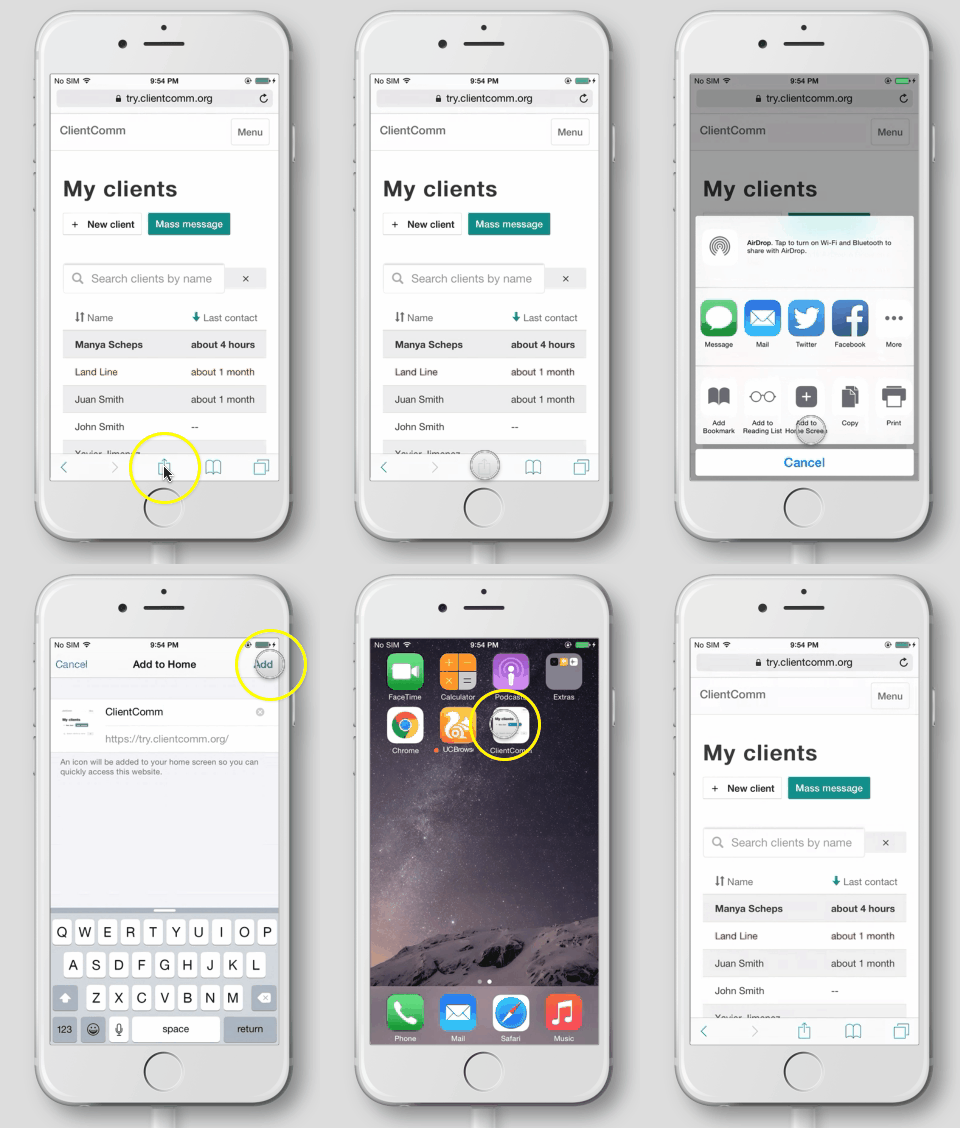
Open your web browser (Safari) on your phone. Navigate to the ClientComm website and log-in.
-
Click the share icon at the bottom of the screen.
-
Scroll until you see “Add to Home Screen.” Click it.
-
Click “Add”.
-
You should now see ClientComm on your home screen! You may need to swipe to find it. If you click it it will open ClientComm, and you can read and send messages from there.
Every time you get a new message on ClientComm, you'll get an email with that message. Click the "Respond on ClientComm" button to reply to this message.
If you use the Chrome or Edge browser to see ClientComm, you can also enable desktop notifications that will pop up when you have a new message from a client. Listed below are instructions to turn these notifications on or off in each browser.
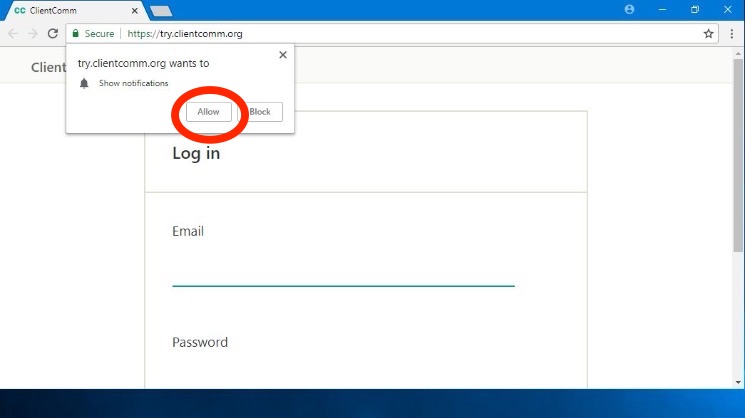
To enable notifications: On your computer, open Chrome and navigate to ClientComm. You should see a popup at the top right asking you to enable notifications. If you'd like to enable these notifications, click "Allow".
To turn notifications off:
- On your computer, open Chrome.
- At the top right, click More and then Settings.
- At the bottom, click Advanced.
- Under "Privacy and security," click Content settings.
- Click Notifications.
- Choose to block or allow notifications:
- Block all: Turn off Ask before sending.
- Block a site: Next to "Block," click Add. Enter the site and click Add.
- Allow a site: Next to "Allow," click Add. Enter the site and click Add.
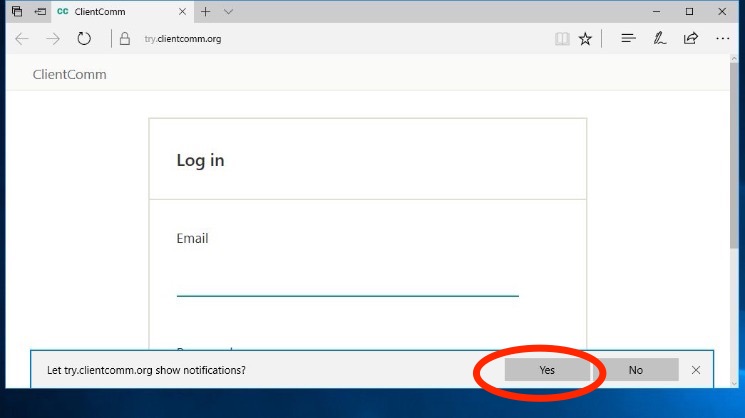
To enable notifications: On your computer, open Edge and navigate to ClientComm. You should see a popup at the bottom asking you to enable notifications. If you'd like to enable these notifications, click "Allow".
To turn notifications off:
- On your computer, open Edge.
- Click the More button in the top-right corner of the window. (It looks like three dots.)
- Click Settings.
- Click View advanced settings. You might have to scroll down a bit to find it.
- Click Manage, located beneath Notifications. You might have to scroll down a bit to find it.
- Click the switch below the website name so that it turns off.
ClientComm can transfer calls to your desk phone.
The ClientComm phone number can only be used to send and receive text messages. The good news is, ClientComm can automatically redirect incoming calls to your desk phone number. You’ll need to add your desk number (or any phone number you can receive calls at) to your account settings page. This will make it easier and less confusing for clients to get in touch with you.
What happens if you don’t don’t have a desk phone number specified on your settings page? Callers will be automatically redirected to the department's main office front desk.
If a client changes their phone number, and tells you in-person, you can update the phone number in the Edit Settings section.
If a client texts or calls the ClientComm number, and their case manager has not updated their phone number in ClientComm, ClientComm will not yet recognize they are your client.
The ClientComm team will try to gather more information to match them to their case manager. During the matching process, they will be an "unclaimed client" in our system.
Sometimes, clients will text the ClientComm phone number from their new phone, to tell you they have a new number.
In that case, they will be sent to our "unclaimed clients" inbox, and the ClientComm team will determine their case manager, then move them to the correct case manager's "My Clients" list.
Sometimes, a client will call the ClientComm phone number from a new number, to tell you they have a new number.
ClientComm will not be able to match the client to the case manager and re-direct the call to the case manager's desk line as usual. Instead, ClientComm will re-direct the call to the department's main office front desk, to be connected to the case manager.
Once the case manager updates the phone number in ClientComm, calls from the client's new phone number will re-direct to the case manager's desk line.
